
Getting your serum to actually work begins long before the first drop hits your skin. Plenty of people think they can just slather it on after washing their face and call it a day, but research shows that properly cleansed and toned skin can increase serum absorption by up to 60 percent. Most users miss out on this boost entirely, and the real culprit isn’t the serum itself, but a skipped or rushed routine. Want glow-worthy results? The real secret comes down to a few ultra-specific steps you probably never learned.
Table of Contents
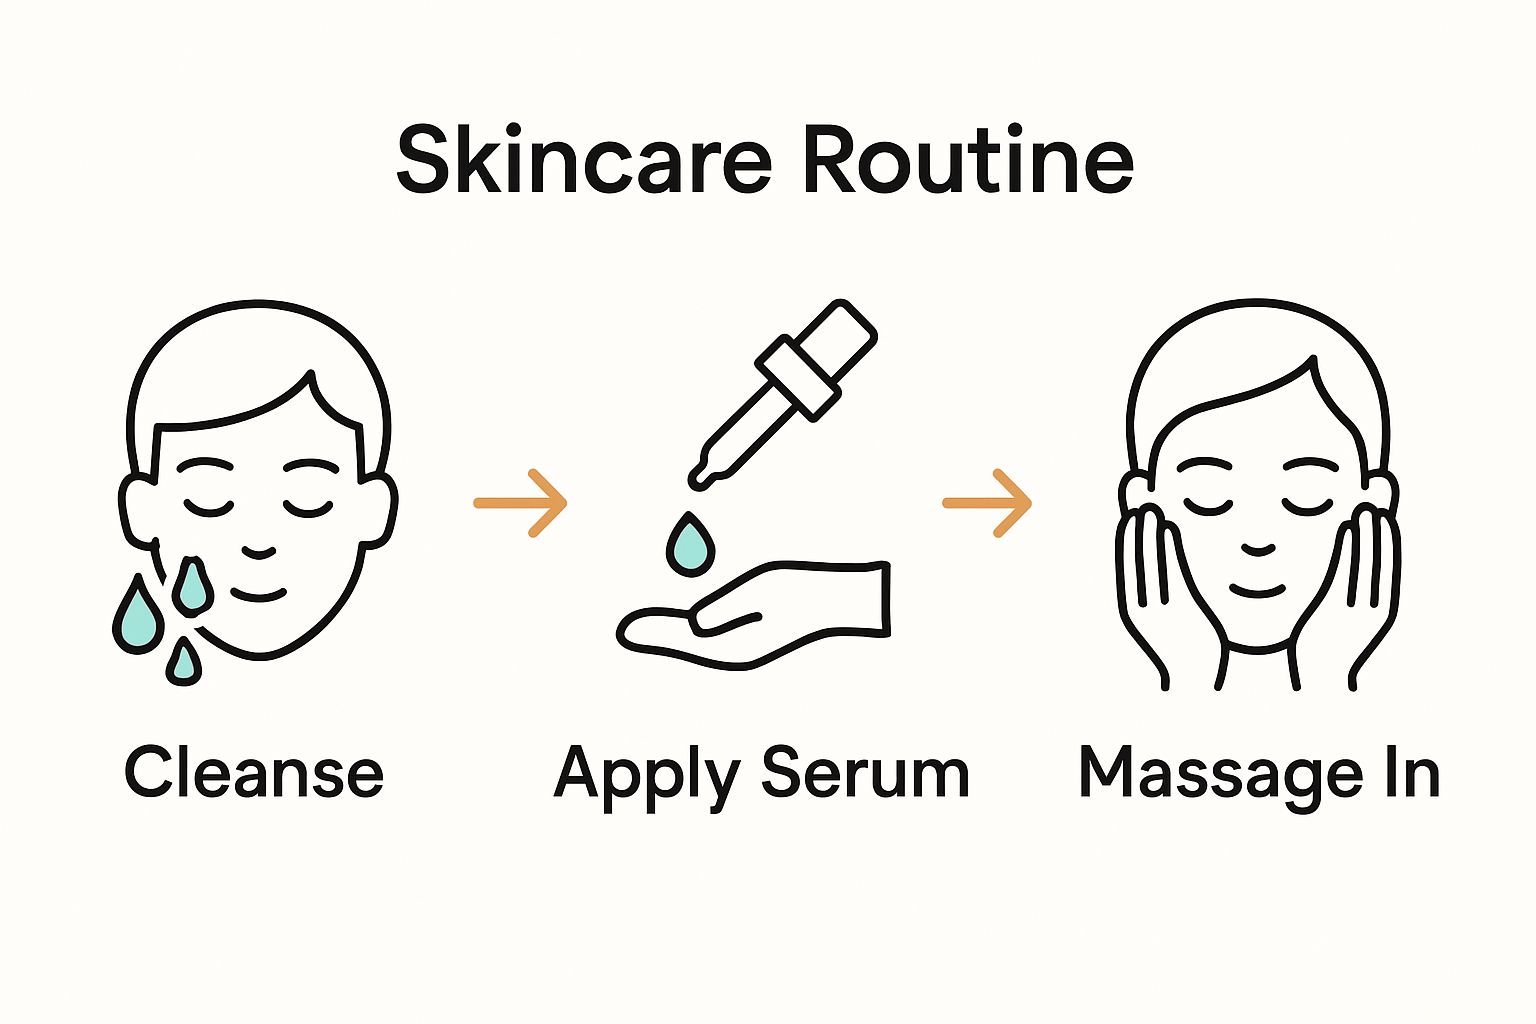
- Step 1: Cleanse Your Face Thoroughly
- Step 2: Apply A Toner To Prepare Skin
- Step 3: Dispense Serum Into Your Palm
- Step 4: Gently Massage Serum Into Skin
- Step 5: Follow With Moisturizer For Hydration
- Step 6: Verify Absorption For Best Results
Quick Summary
| Key Point | Explanation |
|---|---|
| 1. Thoroughly cleanse your face first | Cleansing removes impurities for effective serum absorption, making it essential for optimal skincare. |
| 2. Apply toner to balance skin pH | Toner prepares your skin for serum, rebalancing pH and enhancing absorption of nutrients. |
| 3. Use a pea-sized amount of serum | Applying the right amount prevents product buildup, ensuring your skin receives optimal treatment. |
| 4. Gently massage serum in upward motions | Massaging boosts absorption and improves blood circulation, enhancing the serum’s effectiveness. |
| 5. Follow with moisturizer for hydration | Moisturizer locks in serum benefits and maintains hydration, crucial for healthy, glowing skin. |
Step 1: Cleanse Your Face Thoroughly
Cleansing is the foundational step in preparing your skin to absorb serum effectively. This crucial initial stage removes dirt, excess oil, makeup residue, and environmental pollutants that can block your skin’s ability to receive active ingredients. Think of cleansing as creating a clean canvas for your skincare masterpiece.
Start by selecting a gentle cleanser matching your specific skin type. For those with oily or acne-prone skin, consider a lightweight gel cleanser with salicylic acid. If you have dry or sensitive skin, opt for a creamy, hydrating formula that won’t strip natural oils. Learn more about resetting your skincare routine to understand how each step impacts your overall skin health.
The cleansing technique matters as much as the product you choose. Use lukewarm water to help open pores without causing irritation. Massage the cleanser using gentle circular motions with your fingertips, spending about 60 seconds working the product into your skin. This duration allows the active ingredients to effectively break down impurities while stimulating blood circulation.
Rinse thoroughly with lukewarm water, ensuring no residue remains. Pat your face dry with a clean, soft towel - never rub, as this can cause unnecessary skin stress. Your skin should feel clean, balanced, and ready to receive the nutrient-rich serum you’ll apply next. A properly cleansed face ensures maximum absorption and effectiveness of your subsequent skincare steps.
Key verification signs that you’ve completed this step correctly include:
- Skin feels clean but not tight or dry
- No visible makeup or dirt residue
- Skin appears fresh and ready for next skincare application
Remember, thorough cleansing sets the stage for everything that follows in your skincare routine.
Step 2: Apply a Toner to Prepare Skin
Toner is the secret weapon in your skincare arsenal that bridges the gap between cleansing and serum application. This often overlooked step rebalances your skin’s pH, removes any lingering impurities, and creates the perfect environment for maximum serum absorption. Discover the complete guide to toner benefits to understand its critical role in your skincare routine.
Choosing the right toner depends on your specific skin concerns. Hydrating toners with ingredients like hyaluronic acid work wonders for dry or sensitive skin, while clarifying toners containing niacinamide or witch hazel are ideal for oily or acne-prone complexions. For those with combination skin, look for balanced formulas that provide hydration without excess oil.
Application technique is crucial for maximizing toner benefits. Pour a small amount of toner onto a clean cotton pad - about the size of a quarter. Gently sweep the pad across your face and neck using upward motions, avoiding the delicate eye area. If you prefer a more sustainable approach, you can also pat the toner directly into your skin using clean hands, which helps improve absorption and reduces product waste.
Take your time during this step. The goal is to create a light, even layer that prepares your skin to drink in the serum that follows. Allow the toner to absorb for about 30 seconds before moving to the next step. Your skin should feel refreshed, slightly damp, and primed for nutrient-rich treatments.
To help you choose the right toner for your skin, here is a comparison table of toner types and their main features based on the article’s recommendations.
| Toner Type | Best For | Key Ingredients | Main Benefit |
|---|---|---|---|
| Hydrating | Dry/Sensitive Skin | Hyaluronic Acid | Deeply hydrates, soothes |
| Clarifying | Oily/Acne-Prone Skin | Niacinamide, Witch Hazel | Controls oil, refines pores |
| Balanced/Combination | Combination Skin | Balanced formulas | Hydrates without excess oil |
Key signs you’ve applied toner correctly include:
- Skin feels balanced and refreshed
- No sticky or greasy residue
- Skin appears smooth and slightly dewy
- Pores seem minimized and refined
Remember, toner is not about stripping your skin but about creating the perfect canvas for your upcoming skincare steps. A well-applied toner sets the stage for your serum to work its magic, ensuring maximum effectiveness and that coveted healthy glow.
Step 3: Dispense Serum into Your Palm
Dispensing your serum correctly is an art that directly impacts its effectiveness and ensures you’re getting the most out of your skincare investment. Learn more about incorporating serums for flawless skin to understand the nuanced approach to this critical step.
The amount of serum you use matters significantly. Most serums require only a pea-sized amount to cover your entire face and neck effectively. Resist the temptation to over-apply, as concentrated active ingredients can overwhelm your skin. Too much product doesn’t mean better results - in fact, it can lead to product buildup, clogged pores, or potential skin irritation.
Begin by washing and drying your hands thoroughly to prevent introducing bacteria into your carefully curated skincare routine. Gently tap or pump the serum bottle to release the product. Some serums come with dropper mechanisms, while others have pump dispensers. If using a dropper, hold it vertically and squeeze carefully to control the amount. For pump dispensers, one to two pumps typically provide the perfect quantity.
Once dispensed, warm the serum between your clean palms for a few seconds.
This slight warming helps the product spread more evenly and allows it to absorb more efficiently into your skin. The heat from your hands helps break down the product’s molecular structure slightly, making it more receptive when you apply it to your face.
Key indicators that you’ve dispensed the serum correctly include:
- Serum appears as a small, uniform droplet (about the size of a pea)
- Product feels smooth and not clumpy
- Consistency is appropriate for your specific serum type
- No excess product is wasted
Remember, precision is key. Each serum is a concentrated blend of powerful ingredients, and using the right amount ensures your skin receives optimal treatment without unnecessary waste. Treat your serum like a precious elixir - a little goes a long way in your journey to radiant, youthful skin.
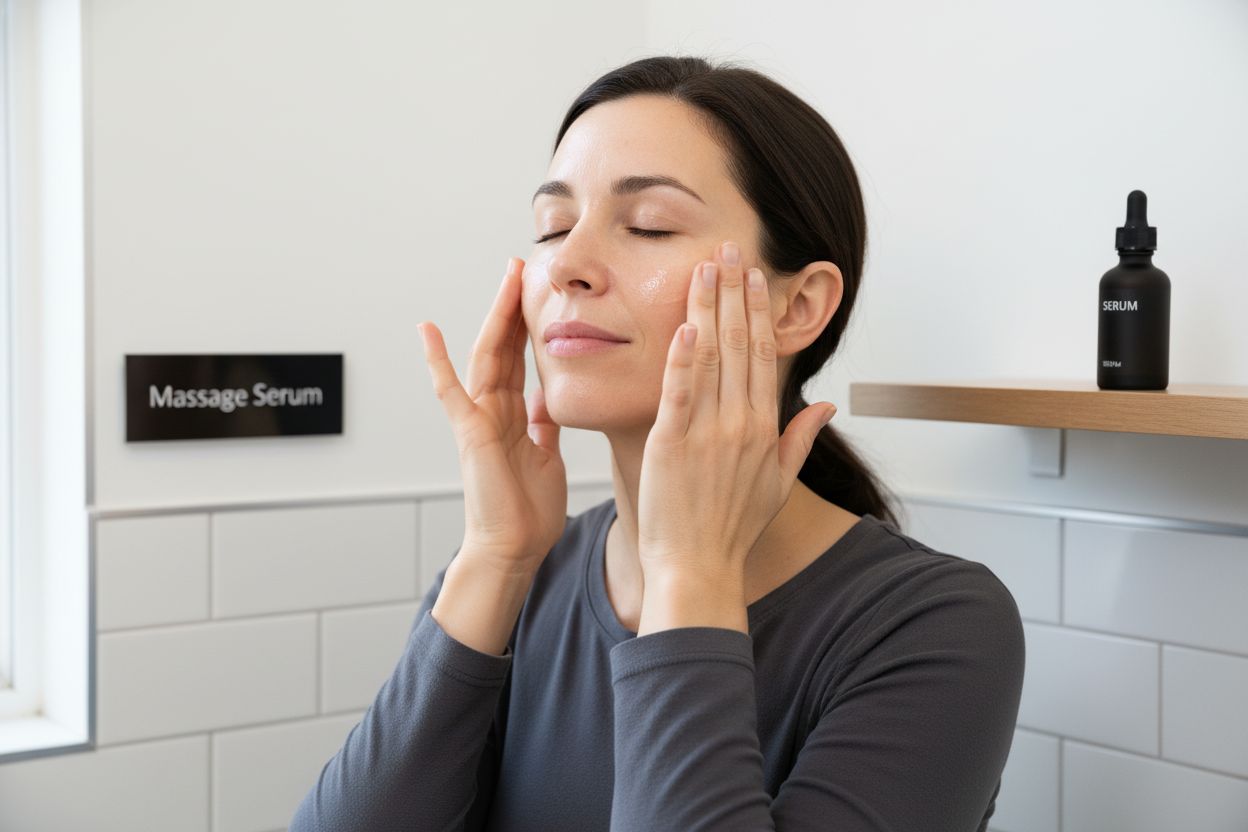
Step 4: Gently Massage Serum into Skin
Massaging your serum into the skin is more than a simple application technique - it’s a strategic approach to maximizing product absorption and stimulating skin health. Learn about layering skincare products for visible results to understand the science behind effective product application.
Gentle, upward motions are key when massaging serum into your skin. Start from the center of your face and move outward, following the natural contours of your facial muscles. This technique not only helps the serum penetrate deeper but also promotes lymphatic drainage and improves blood circulation. Think of it as giving yourself a mini facial massage that enhances both product efficacy and skin vitality.
Pay special attention to areas with specific concerns. If you’re targeting fine lines around the eyes, use your ring finger to lightly tap the serum with minimal pressure. For areas prone to congestion like the T-zone, use slightly firmer circular motions to help the active ingredients work more effectively. The goal is to create a smooth, even layer without pulling or stretching the skin.
Timing is crucial during this step. Spend approximately 30-60 seconds massaging the serum, allowing it to fully absorb into your skin. Your skin should feel slightly damp but not wet, with no visible residue. If the serum feels heavy or takes too long to absorb, you might have applied too much product or the formula might not be ideal for your skin type.
Key verification signs that you’ve massaged the serum correctly include:
- Skin appears smooth and slightly dewy
- No visible product residue or greasy feeling
- Serum feels completely absorbed
- Skin feels hydrated and plump
Remember, the massage is not just about product application - it’s a moment of self-care that connects you with your skincare routine.
 Approach it mindfully, treating your skin with the gentle respect it deserves.
Step 5: Follow with Moisturizer for Hydration
Moisturizer is the final seal that locks in all the powerful ingredients from your serum, creating a protective barrier that keeps your skin hydrated and helps active ingredients work more effectively. Explore the top ingredients for clean moisturizer choices to understand how to select the perfect product for your skin.
Timing is critical when applying moisturizer. Wait approximately 30-60 seconds after your serum application to ensure it has been fully absorbed. This brief pause allows the serum’s active ingredients to penetrate deeply into your skin before you seal everything in with your moisturizer. Choose a moisturizer that complements your serum’s ingredients and addresses your specific skin concerns.
Apply the moisturizer using the same gentle, upward motions you used with the serum. Start from the center of your face and move outward, avoiding pulling or dragging the skin. Use slightly more pressure than with the serum to ensure even distribution, but maintain a light touch. A pea-sized amount is typically sufficient to cover your entire face and neck.
For those with combination or oily skin, opt for lightweight, gel-based moisturizers that hydrate without feeling heavy. If you have dry or mature skin, choose richer cream formulations that provide intense moisture and support skin barrier function. Pay extra attention to areas prone to dryness, such as around the eyes and along the jawline.
Key verification signs that you’ve applied moisturizer correctly include:
- Skin feels soft and smooth
- No greasy or sticky residue
- Moisturizer is fully absorbed within moments
- Skin appears plump and hydrated
- No visible product buildup or pilling
Remember, moisturizer is the protective shield that helps your serum work its magic. By creating the right environment, you’re not just hydrating your skin - you’re maximizing the potential of every carefully selected skincare ingredient.
Step 6: Verify Absorption for Best Results
Verifying serum absorption is the final checkpoint in your skincare routine, ensuring that those potent active ingredients have been effectively delivered to your skin. Understanding skin ingredient penetration reveals the critical importance of proper application and absorption techniques.
Absorption is more than just visual observation - it’s about understanding how your skin feels and responds. Immediately after applying your moisturizer, take a moment to assess your skin’s texture and appearance. Properly absorbed products should feel seamless, leaving no sticky residue or visible product film. Your skin should appear smooth, slightly dewy, and have a natural, healthy glow.
Perform a quick tactile test by gently pressing your fingertips against your cheek and forehead. If the product has been correctly absorbed, your skin will feel soft and supple, with no greasy or slippery sensation. Pay attention to how your skin looks in different lighting - natural daylight provides the most accurate assessment of product absorption and overall skin appearance.
Some variations in absorption can occur based on your skin type and the specific serum and moisturizer you’re using. Oily skin types might experience faster absorption, while dry or mature skin could require a bit more time for products to fully penetrate. If you notice any pilling or uneven texture, it might indicate that you’ve applied too much product or that the formulations are not completely compatible.
Key indicators of successful serum and moisturizer absorption include:
- Skin feels smooth and hydrated
- No visible product residue
- Makeup applies evenly afterward
- Skin appears plump and radiant
- No unusual tightness or discomfort
Remember, skincare is a personal journey. What works perfectly for one person might require slight adjustments for another. Be patient with yourself and learn to read your skin’s unique responses to different products and application techniques.
Here is a quick summary table to help you verify if each step of your serum application routine has been completed correctly.
| Step | What to Verify | Successful Outcome |
|---|---|---|
| Cleanser | Skin feels clean, no tightness or dryness | Fresh and residue-free |
| Toner | Skin is balanced, not sticky or greasy | Smooth with minimized pores |
| Serum Dispense | Pea-sized droplet, smooth consistency | No excess product, ready to apply |
| Serum Application | Even massage, no visible residue | Serum fully absorbed, hydrated feel |
| Moisturizer | No greasy/sticky residue, well absorbed | Plump, hydrated, soft skin |
| Final Absorption Check | Skin smooth, no residue, soft/supple | Natural glow, no discomfort |
Unlock Your Best Glow with Belle Vie: Science Meets Pure Beauty
Finding it tough to achieve that smooth, youthful skin after carefully massaging in your serum? You are not alone. The article explains that proper cleansing, gentle application steps, and making sure your serum fully absorbs are critical for visible results. Many struggle with residue, irritation, or lackluster skin even after following every step. If you feel like your efforts go to waste or your glow fades too quickly, your products may not be as pure or potent as your skin truly needs.
Explore Belle Vie’s natural facial cleansers and toners for that essential clean canvas. Pair them with our advanced anti-aging serums and moisturizers to power up your routine. Every formula blends European clinical science and organic ingredients for deep absorption and lasting radiance.
Take the next step to glowing, healthy skin. Explore our full collection today and experience the results of pure, effective skincare. Now is the perfect time to elevate your regimen with clean beauty that truly delivers.
Frequently Asked Questions
How often should I apply serum for youthful, glowing skin?
Applying serum should be done once or twice daily, depending on your skin’s needs. Use it after cleansing and toning, but before moisturizing, to maximize absorption and benefits.
What amount of serum should I use for the best results?
A pea-sized amount of serum is usually sufficient to cover your entire face and neck. This helps prevent product buildup and irritation while ensuring your skin receives the potent ingredients effectively.
How do I properly massage serum into my skin for maximum absorption?
Use gentle, upward motions starting from the center of your face and moving outward. Spend about 30-60 seconds massaging the serum to enhance absorption and stimulate circulation.
Can I layer different types of serums for better results?
Yes, you can layer serums, but apply them in order of consistency, from thinnest to thickest. Allow each serum to absorb fully before applying the next to ensure your skin gets the maximum benefits from each product.
How do I verify that my serum has been absorbed properly?
Your skin should feel smooth, hydrated, and have no visible residue after application. Perform a quick tactile test by gently pressing your fingers on your face; it should feel soft and supple, indicating successful absorption.
Should I adjust my serum application technique for different skin types?
Yes, adjust the amount and type of serum based on your skin type. For oily skin, use lightweight serums with fewer active oils, while dry skin may benefit from richer formulations; always adapt to your unique skin needs.